


The router uses a DHCP (automatic) connection from your modem by default. If your internet service provider (ISP) requires manual settings to establish an internet connection, this article will guide you through configuring your router using PPPoE or other connection types.
Choose one of the following setup methods:
- Instant-Install setup wizard (Preferred)
- Web interface (Alternative): Access the router’s settings via the Log in to router link. This method should only be used if the wizard cannot connect to your service.
Instant-Install setup wizard (Preferred)
Before you begin:
- Make sure you have the required service provider settings written down.
- Write down the WiFi password of the node that will become the parent router.
- Parent router: The parent router is the router that will be connected to your modem.
- Child node: An additional node used to extend your WiFi, such as another Linksys LN1600.
1. Gather all your equipment in the same area as your modem. After setting up, you can relocate the child nodes.
2. Remove any existing router:
- a. I have a modem with a separate router.
- Disconnect your existing router.
- Power cycle your modem.
- b. I have a WiFi router and modem in one device, or I do not have any existing routers in my home.
- Go to the next step
3. Connect the parent router with an ethernet cable from the Internet port to your modem.
4. Connect the power adapter to your router and power it ON. Make sure to select the appropriate accessory plug for your region. Accessories may vary.

Learn how to assemble the power adapter.
5. When adding child nodes, place all child nodes near the parent router, no more than 10 ft away, preferably in the same room, and power them ON. Wait until all your nodes have a solid blue light, indicating they are ready for setup.
During setup, do not plug any ethernet devices into the child nodes' port.
If any of the nodes do not have a solid blue light, reset them by holding down the reset button for about 15 seconds, then waiting until the light becomes solid blue.

6. Connect a mobile device or computer to the WiFi name of the parent router. You can scan the QR code on the bottom of the parent router to connect to the WiFi or use the WiFi credentials for manual entry.
7. Launch a desktop browser and enter "www.myrouter.info" or "myrouter.info" into the Address bar and hit [ENTER]. You can also log in using the default IP address of your router, "https://192.168.1.1".
8. If you receive any browser warning messages, follow these instructions to bypass the browser message.

Click Continue.

9. Select Enter ISP settings.

10. Click your current connection type. In this example, PPPoE is used.

11. Enter your ISP’s required settings and click Next.

12. The router will attempt to detect an internet connection again.
If there is no internet connection, double-check your settings, verify them with your ISP, and then repeat the steps.

If detection is successful, proceed with the rest of the setup wizard.
13. When you reach the + Add nodes screen, make sure that the child nodes you will be adding are powered ON and are displaying a solid blue light. Click Next.
The parent router will then begin to scan the new child nodes.

14. Once your child nodes have been added to your network, they will appear on the list. Click Next.

Some nodes may take a little longer to appear. If the node is still flashing a white light, wait until it becomes a solid white light, then click Refresh.
If the light is still solid blue, that child node was not detected. Make sure this node is closer to the parent router (less than 10 ft away). Click Try again.
15. Your WiFi is now ready. You can print or download the QR code to connect with other clients. Click Done.

You will be taken to the router’s Home page.

Through the web interface (Alternative)
This method can be used when the setup wizard cannot establish a connection with your ISP and you need access to other internet settings.
Before you begin:
- Write down the WiFi password of the node that will become the parent router.
- Parent router: The parent router is the router that will be connected to your modem.
- Child node: An additional node used to extend your WiFi, such as another Linksys LN1600.
1. Gather all your equipment in the same area as your modem. After the setup, you can relocate your child nodes.
2. Remove any existing router:
- a. I have a modem with a separate router.
- Disconnect your existing router.
- Power cycle your modem.
- b. I have a WiFi router and modem in one device, or I do not have any existing routers in my home.
- Go to the next step
3. Connect the parent router with an ethernet cable from the Internet port to your modem.
4. Connect the power adapter and power ON the router. Select the appropriate accessory plug for your region.

Learn how to assemble the power adapter.
5. Wait until the light is solid blue. If the light is red, hold down the reset button for about 15 seconds, then wait until the light is solid blue, which indicates the router is ready for setup.
6. Connect a mobile device or computer to the WiFi name of the parent router. You can scan the QR code located on the bottom of the parent router or use the default WiFi credentials for manual entry.
7. Launch a desktop browser and enter "www.myrouter.info" or "myrouter.info" into the Address bar and hit [ENTER]. You can also log in using the default IP address of your router, "https://192.168.1.1".
8. If you receive any browser warning messages, follow these instructions to bypass the browser message.

Click Continue.

9. Click on Log into router.

10. Customize your WiFi name and password, and then click Next.

11. Reconnect to your WiFi using your new WiFi name and password. Click Next.

12. Click Done.

13. You can print or download the QR code to connect your devices once the router is online. Click Done.

14. Once you land on the Home page, go to Menu.
![]()
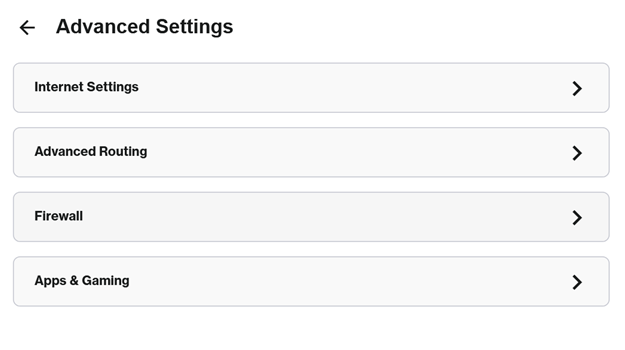
15. Click on the Advanced Settings tile.

16. Click on Internet Settings.
17. Click the edit icon.

18. Select PPPoE or another type of connection from the drop-down menu.

19. Enter your ISP settings and click Save.

20. Once the router detects an internet connection, the light on the parent router will turn solid white.
21. Click on the Home tab at the top to check your Internet status.
![]()

No solid white light?

Red light - It means there's no internet connection. Make sure that the parent router is connected to your modem. You may need to contact your ISP to double-check the required ISP settings and try again.
Once the parent node is online, you can add more nodes to your network.

