This article will teach you how to set up the Linksys SPNMX42BF-UK or SPNMX56BF router.
Before you begin:
- Your router must be directly connected to the BeFibre® modem. With the latest firmware, BeFibre now requires VLAN 10. If your router is not directly connected to the BeFibre equipment, it will not detect an internet connection.
- The default WiFi name is BeFibre_xxxx (the xxxx are the last four digits of the router's MAC address).
- Auto Configuration Server (ACS) support - This model provides ACS support allowing automatic setup. Once the node is plugged into BeFibre’s equipment, the node will automatically configure itself as a parent node and apply the internet settings. Once the light turns solid blue, the node is ready to use. Do not use the Linksys app for setup, as it will not detect the node during this process.
- Parent node - A parent node is the Linksys SPNMX42BF or SPNMX56BF connected to your modem.
- Child node - A child node is another node used to extend your WiFi network. The child node can be wireless or wired. Although a node that is NOT from BeFibre may be added to your network (so long as it will be set up as a child node and not as the parent node), it is important to note that this node may not benefit from features that BeFibre offers. Contact BeFibre first.
Directions:
Images may vary by model.
1. Connect an ethernet cable from your BeFibre modem's port to the internet port of the Linksys node.

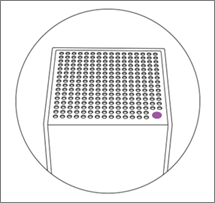
2. Power ON your node and wait for the status light to turn solid purple, meaning it is ready for setup. The status light will then flash white indicating that the node is going through an automatic setup.

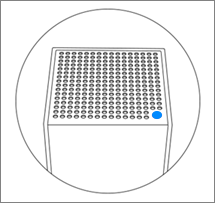
3. Wait until the status light is solid blue. This may take a few minutes. Once the status light is solid blue, the router is ready to use.

Status light did not turn blue?
- Make sure that the Linksys SPNMX42BF or SPNMX56BF is connected to your modem using the Internet port on the Linksys router.
- No light? Make sure the router is powered ON.
4. Now you can connect your mobile devices to the WiFi name of the Linksys router. The WiFi credentials are on the underside of the parent router connected to the modem.
Your node is now set up. To manage your node with the Linksys app, proceed to the steps below.
Linking your Linksys cloud account to the Linksys app
If you want to use the Linksys app to manage your settings from any mobile device, download the Linksys app for Android™ or iOS devices, then link your network to your Linksys cloud account.
Steps and images may vary by the version of your Linksys app and the operating system of your mobile device. In the examples below, an iOS device is used.
1. Connect your mobile device to the WiFi name you just created.
2. Launch the Linksys app and tap Manage Your Wi-Fi.
For Android, tap on Log in.

3. Either enter your existing Linksys cloud account credentials or tap Create an account and follow the on-screen instructions to create an account.
For Android, you will see Create an Email Login as an option.

If you'd rather not create an account, tap on Router Password and enter the router’s local password. If this is the first time you are logging in, tap on Reset password to create a new one.

4. Tap Add to account.

5. Enter the router’s local password then tap Add to Account again.

You have now linked your network to your Linksys cloud account.
Find out more:


