The Dynamic Domain Name System (DDNS) service lets you assign a fixed domain name to a dynamic internet IP address. This is useful if you are hosting your website or if you have a server setup behind your router.
The Linksys Dual-Band WiFi Router supports both DynDNS and TZO. Make sure to create an account with either provider before using this feature. Follow the steps below to enable a DDNS service.
The Linksys Dual-Band WiFi Router supports both DynDNS and TZO. Make sure to create an account with either provider before using this feature. Follow the steps below to enable a DDNS service.
1. Log in to the Linksys Dual-Band WiFi Router's web interface.
2. Click the Configuration tab.
3. Click Security.
4. Click DDNS.
2. Click the Configuration tab.
3. Click Security.
4. Click DDNS.

5. On the DDNS page, click the drop-down button for DDNS Service and set it to Enable.

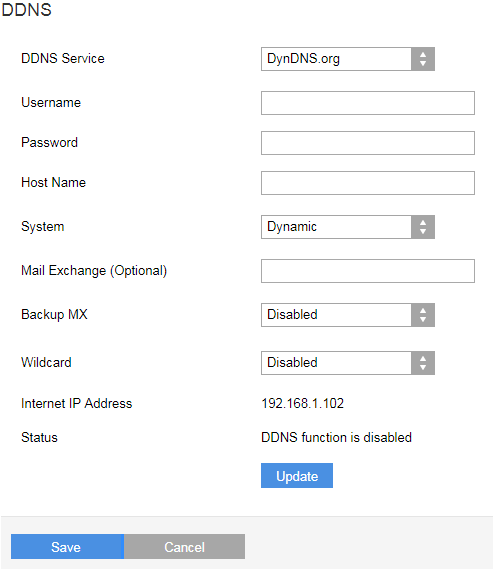
6. Once enabled, select your provider in the drop-down for DDNS Service. In the image below, DynDNS is used as an example.

Enter the following DDNS service account details in the specified fields:
-
Username – Enter your DDNS username.
-
Password – Enter your DDNS account password.
-
Host Name – Enter the host name you used for your DDNS account.
-
Mail Exchange (optional) – Enter the address of your mail exchange server, so emails from your DDNS address will go to your mail server.
Select the following options:
-
System – Select the DDNS service that you are using. The default is Dynamic.
-
Backup MX – This option allows the Mail Exchange (MX) to be a backup. The default option is Disabled.
-
Wildcard – This option lets you use wildcards for your DDNS address host. The default option is Disabled.
The Status field will display your connection status.
7. Click Update to apply the changes.
8. Click Save.
You have successfully updated your DDNS settings.


